Fireplace Artwork

We've gone back and forth over what should be above the fireplace ever since we first walked in the house for our first showing.  The fireplace is the first thing you see when you walk in the door, so I thought a painting would be lovely there, while the realtor proclaimed that a huge flat screen would be great in that spot.  Well, I eventually won, because I'm about 90% sure we have decided to find some kind of art to hang in that spot.  If you're wondering what that spot looks like, here is a picture from the listing:


We are almost done painting the bookcases, and will have pictures of that up once they are finished, but for now we are searching for something to hang there.  I really need to measure that space, because I guess I don't even know how big of a painting we would need.  It's big, though, so I'm thinking at least 24x24, probably larger.  The back of the bookcases are the same color as the kitchen (New York State of Mind) and the cabinets are the trim color (Mascarpone).  I'm using red to decorate the shelves, and I'm really wanting to put this Silhouette Sofa from Crate and Barrel in the room as well:


Along with the chairs that are in the picture from the listing (on the left), however we are painting and reupholstering them.  Here they are now:


So, with all of that in mind, I'm looking for a painting...I'm thinking yellows will be good, and I like florals that aren't too flowery (heh...I know, that doesn't make much sense.)

While randomly searching etsy, I found the artist B. Sasik, and I am just in LOVE with her paintings.  Here is a link to her etsy store.

I love the texture, the colors, the composition, the subjects...everything.

This one is my favorite, it is called "Poppy Art," but unfortunately is only 12"x12" and too small for that area :(


B. Sasik Original Oil Painting POPPY ART Abstract Contemporary Fine Art Modern Palette Knife
I really like "Rainy Night" too, but think it might be a little too busy and colorful for the room:

B. Sasik Original Oil  Painting Rainy Night ART
So, if anyone has any suggestions of places to find art or people who sell it, I'd love to hear.  I have a feeling this selection process will take a while...

Read more...

The First Week (and a few days)

It has been one week and 4 days since Tony closed on the house, and while it feels like we've literally been working non stop, it doesn't exactly feel like there is a lot to show for it.  Most of the work we have been doing is destructive (lots of tearing down wallpaper, sanding, preparing, etc) and I'm just looking forward to the more fun stuff.

Here are a few pictures from the first week or so of the new house:

Not the best picture, but this is us right after Tony closed and we first walked in the door.
So, the previous owner's family left a handful of little things around the house.  Including some really nice Calphalon cookware, Pyrex bowls, lots of ziplock baggies, foil, mixing bowls, and my favorite thing: this "Meals in Minutes" bag sealer along with tons of boxes of different sized bags to be used with it.  The previous owner was incredibly clean, and took excellent care of her things, which is evident in everything we find.  The same can be said for this awesome little machine.  It isn't anywhere near as great as the vacuum-sealing contraptions that they have now a days, but I just think it is adorable and very retro.  I had fun sealing extra screws in little baggies :)

Seal A Meal...love it.

Like I said...I was sealing lots of random things...just for fun! :)

The very first thing Tony did when we got to the house was remove this gingerbread decorative door things.  They were in the entry, living room and the closets in the master bedroom, and he immediately removed them.  It was quite a relief.
The entry wallpaper proved to be quite the task.  It took a total of maybe 10 hours of 2 people constantly working on the  walls to finally get it all off.  Not to mention, once the wallpaper was gone, we realized that underneath the wallpaper was a skim coat that was put on over another layer of wallpaper.  So, after finding a kind of destroyed wall beneath the wallpaper, we realized we were going to have to add another skim coat to keep a smooth surface.  Tony is about halfway through putting the skim coat on, so hopefully it provides a smooth enough surface to paint, otherwise, we might have to end up wallpapering the entry (which after removing all of this wallpaper, I never want to deal with the stuff again), so we're hoping the skim coat works and we can paint it.
While Tony and his dad worked on the wallpaper in the entry, I decided to tackle the hallway wallpaper in between letting paint dry on the cabinet doors.  I was prepared for it to be just as difficult as the wallpaper in the entry and in the kitchen, but shockingly it came off SO much easier.  Poor Tony, I go into the hallway to begin, and come out 10 minutes later with a strip of wallpaper that would have taken them 2 hours to get off.  I was really proud of my strip of wallpaper :)  And ignore my really cute hair/lack of makeup.  It had been a very long day.

Found this in one of the cabinets...we kept it so we could try it some day :)
Poor guy spent so much time in this room getting the wallpaper off.  Then, once it was off, the wallpaper they had taken off the walls ended up all of the floor stuck to the marble.  So, then he spent a lot of time cleaning that up. :(  At least it's done!
This is where I spent a majority of the first week.  I had no idea painting cabinets would be such a task, but it was.
While removing the wallpaper in the kitchen, we found that originally, the walls beneath the wallpaper were blue.  It was kind of fun to find out that we had chosen to paint the walls a similar color as what they had originally been painted.  Kind of made us feel like we made the right choice :)
I could say a million things about the picture, like how 1) we are so unorganized and this is our "supply room" but the main reasons I'm posting it are to "show off" the infamous mirrored wall, and to show off my amazing head lamp.  First, the mirrored wall...if you haven't noticed it in any house pictures, then good...but if you have you were probably wondering why there was a floor to ceiling mirror right in the middle of the formal living room...so were we.  We really don't like it or want it there, but due to be unsure of what is behind it, and because we have a hutch that will fit in front of it and cover most of it, we aren't worrying about it right now.  When Tony told his realtor this, the realtor told us that if he sells the house down the road, he will make us remove the mirror before he lists it...so I guess it will eventually have to go...it's just so large...and daunting.  #2: My headlamp.  I never thought I would love a headlamp so much, but I do (seriously).  This thing has been AMAZING while painting, and when I don't wear it I feel like I can't see anything.  I kind of feel like that fish on Finding Nemo:


Anyhow, the thing stays on my head the whole time I work, and I swear, without it I would have screwed up a lot more edges that I already did :)
O'Keeffe's Working Hands: This is another product that has been an absolute life saver.  I've seen it lots of places, but randomly picked it up at Ace Hardware the first day we were in the house before I even realized we would need it.  It is so much better than any other lotion I have used because it is incredibly moisturizing, but not greasy at all.  Tony and I both swear by it, and have been using it religiously.
I just love the way this house looks in the snow.  I can't wait to see what it looks like in the summer with that big tree in the front yard on the pretty corner lot, but for now, I love driving by it and seeing all the pretty snow on the white house.  I took these the day after a big snow last week.


-Annie

Read more...

Kitchen...95% Complete

Well, I never thought it would actually happen, but the kitchen is almost done.  It feels SO good to finally have one room close to completion.  I think after doing the kitchen, every other room is going to seem much easier, because the kitchen ended up being such a task.

In all we:

  • Painted all of the cabinets (Benjamin Moore Mascarpone)
  • Replaced all of the knobs, pulls and hinges in Venetian Bronze
  • Painted all of the trim (Benjamin Moore Mascarpone)
  • Painted the wainscoting (Benjamin Moore Mascarpone)
  • Painted the walls (Benjamin Moore New York State of Mind 10% lighter)
Things that still need to be done:
  • All of the hardwoods are going to be refinished darker and a little redder
  • Paint the ceiling (we just bought a generic Behr ultra white ceiling paint for this)
  • Window treatments...this may take a while
  • Find a chandelier/light fixture for above the table
But, overall we are both thrilled with how it turned out.  Before, the whole house was the same color (seriously...the whole thing).  The walls, trim, cabinets, and even the ceiling in some rooms was the same dark tan (we found the can of paint downstairs and it is called Almond).  It just made the house seem much darker and smaller.  Now that the kitchen is painted, I love sitting in the room...it is much fresher and brighter and more inviting.  We obviously need to decorate, and we are missing 10 sets of hinges, so a few cabinet doors aren't attached...but once those come in we will be all set.

Here is the kitchen before (These pictures really don't do the dark almond paint justice...in real life, this room was a lot muddier before


And here are the after pictures:


I love these coffee cups from Crate and Barrel.  They say "Breakfast" on them and I thought they were just perfect for the breakfast nook.

This is the hardware we chose.  We originally wanted something brushed nickel or another similar finish, but while I was standing in the kitchen hardware aisle (for 2 hours) I overheard a lady and her designer discussing Venetian Bronze being the new "hot" finish for kitchens.  I hadn't even considered a finish like this before, but hearing that made me interested.  I looked into it a little and was sold.  We love how it looks.

It's a little hard to tell from the pictures, but the finish is overall pretty dark, but not black.  In person it looks about like the the handle in this picture.  It has bits of bronze shining through the darker finish, and the man who helped me said that over time, the areas you use most will rub away and more of the reddish bronze color will show through, which I totally love.

Read more...

Paint Revisited

Basically...painting really stresses me out.  Especially when you're using a paint with a ton of pigment that dries really fast.  For the blue in the kitchen, we decided on Benjamin Moore's New York State of Mind.  Because the blue was so dark and rich in color, we knew we needed a really good paint quality, so we went with the Aura Paint, the highest quality paint BM makes.  While it was quite a bit more expensive that just your standard paint, it was absolutely worth every penny.  It was around $60 a gallon, but I can say with total confidence, that had we not purchased the nicer paint it would have taken 4x as much paint to cover that room, and we would have probably spent as much on the cheaper paint because we would have needed more.  The sample can we got of the New York State of Mind was just the stand paint Benjmain Moore has, and when we painted the sample on the wall it took SO many coats to even cover it and it looked kinda "meh."  It was a totally different story with the Aura paint.

The Aura paint covered SO well...the wallpaper that we took down in the kitchen was VERY difficult and we really struggled to remove it.  There were lots of areas on the wall that were noticeably shallower or just deformed because of all of the repairing and sanding we had to do after the wallpaper was down.  The Aura paint covered every imperfection in 1 coat.  Seriously...1 freaking coat.  The only downside was that it dries SO fast (yup,  that's a downside).  I couldn't work quick enough to keep a wet edge, and was struggling to move the ladder to the next area so that I could seamlessly continue the painting without my previous application drying first.  The first coat looked AWESOME, but I ended up doing another coat just because I knew it would make it look even better...and it did.  I didn't take any after pictures when it was all completed, but here are a few "during" pictures from my trusty iPhone...

The kitchen all prepped...wallpaper gone, and cabinet frames cleaned.
First coat of the New York State of Mind done...no trim/cabinet frames painted yet


First coat of the New York State of Mind done...no trim/cabinet frames painted yet...sorry for the terribly pic quality.
Daylight picture of 1 coat of blue and some trim paint done.  This picture is probably the most true to the actual color of the trim and the blue.


The next 3 pictures were all taken late at night with really poor lighting so the color is way off, but they are pictures of 2 coats of the New York State of Mind and I think almost all of the trim and cabinet framing done.  Of course, I still have lots and lots of touchups to do :(


I guess I have a few pictures from my actual camera I took early on in the process of painting the kitchen...

Without internet or cable yet it is kind of hard to stay entertained while painting for hours, so my iPad and streaming Netflix...I think I watched 5 documentaries (seriously).

I kind of like the way the frog tape looks next to the blue :)
There is still a lot of touching up to do in the kitchen, and I'm just kind of stressed out about all of the edges and how they aren't super clean...but I guess that will all come in time...

-Annie

Read more...

Paint

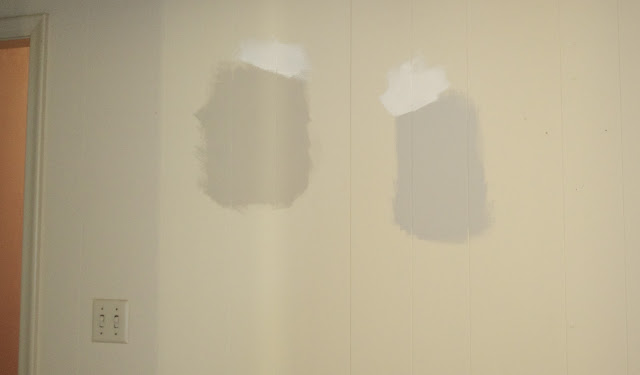
I mentioned paint in the last post, so I figured I would talk about the the color palette we decided on.  It is mostly light colors with a dark blue in some spots (and a few undecideds).  The wall color we decided on for most of the house was a light gray.  When it comes to lighter colors, I will never trust a paint swatch again, because all of the colors looked SO different on the wall than they did on the swatches.  So, after much deliberating we narrowed down the wall color for the living room, formal living room and guest bedrooms (for now) to Benjamin Moore Revere Pewter (a much more beigey gray...greige) and Benjamin Moore Stonington Gray (it looks nothing like the online paint swatch on the link).

After painting both of the samples in a few rooms at the house, Tony decided on the Stonington Gray.  I'm really excited to see what it is going to look like without the pre-existing dark cream walls behind it.  Here is a terrible picture of what they look like in the formal living room:

Mascarpone and Revere Pewter on the Left, Mascarpone and Stonington Gray on the Right
We wanted a white for the trim, but Tony was insistent that he did not want a bright white, so we went with a much warmer white that would warm up the cool gray.  Well, after 2 weeks of debating a white we (okay, my mom) finally found Benjamin Moore's Mascarpone (doesn't really look like that online swatch either...)  We love the Mascarpone, and so far it looks great on the cabinets.

The blue is going to be in the front entry, on the backs of the bookcase and above the wainscoting in the kitchen...I really wanted a rich blue that was closer to a jewel tone, but not purple.  I didn't want Navy, but I wanted the color to be closer to a Navy than a true blue if that makes any sense at all.  So, after narrowing it down to Lucerne and New York State of Mind (both Benjamin Moore).  After getting samples of each and actually seeing them on the wall, we decided on New York State of Mind hands down.  Lucerne was much too green/teal and not exactly what we wanted.  New York State of Mind looks nothing like the online paint swatch, so I'll try and take a picture of the paint sample on the wall today...

The final color that we have picked out is for the full bath in the hallway.  The majority of the bathroom is tiled with white tiles as you can see here:


There are also a few cute accent tiles around the vanity area that have blues, greens, yellows and I think the dark color is purple.


So, I really wanted to do a wall color in here that pulled form the accent tiles, because even though I believe they are original from when the house was built in 1962, I think they are very charming and I don't mind them at all.  So, the obvious choice for me was green.  One of my favorite colors is what I like to call: Kate Spade Green.  I've always liked the color green, but my obsession with "Kate Spade Green" began when I received this wallet as a birthday present 4 or 5 years ago:

Yes, it needs to be cleaned badly...but I love it just the same.
Tony also likes the color, so we decided to look for a paint color to match the wallet for the guest full bath.  We also wanted to save a little money on this paint, so instead of getting Benjamin Moore, we were open to doing something from Home Depot or Lowes.  While at Home Depot, buying kitchen hardware (a whole other story) Tony spotted Martha Stewart's Bay Leaf.  The swatch looked just about perfect, so we purchased the little 8oz sample to try it out.  After painting a small patch on the wall we love it and are going to go with this color for the guest bath.  So happy to have figured that out so easily.

In person it is a tiny bit darker than this, but this is pretty spot on as far as tint goes.

Read more...

  © Blogger template Shush by Ourblogtemplates.com 2009

Back to TOP